Wiki
Clone wikipypsdier / Tutorial
Description
Pypsdier has been constructed as a library. The main reasoning behind the library is that after reaction-diffusion equations are solved, we must store parameters, pde and ode results into a file, that will be named the seed file. The seed can be later be explored into a myriad of ways, and further data analysis can be pursued even after the simulation has ended. The seed is self-contained and no other files are required, as it contains all the parameters that lead to the results stored within. They can be then stored, shared or analysed, and they are guaranteed to be read cross platforms and within future changes of pypsdier.
Creating a simulation file
For the michalis-menten reaction of PenG we have the file example_1_mm.py, containing
- The import that load pypsdier module
- The definition of the Reaction function, as a python function.
- The definition of the catalyst enzyme concentration, defined as a function of time (although it can be a defined as a constant as well, see the other examples).
- The dictionary parameters that store all the parameters. The naming of the parameters (the keys) must be exactly the same as in the examples.
- The execution of the PDE solver.
- The execution of the ODE solver.
It is posible to run only the PDE, only the ODE, or both. The advised order is to put the PDE solver first, so the ODE solver will take exactly the same time steps.
Running the simulation
To run the simulation you just need to execute the python file:
#!python

python example_1_mm.py
This authomatically will generate the file named as indicated by params["SeedFile"], in our example, example_1_mm.rde. The rde extension will be only extension accepted by pypsdier.
Notice that you can change the values for the parameters and the SeedFile in the file example_1_mm.py, and generate a series of different seed files. There is no need to store the original python file, example_1_mm.py, as it can be recreated from the seed file if it is needed later.
Extracting info from the seed
To extract information from the seed, you need a seed handler. You can use the one that is automatically generated with pypsdier, seed_handler.py, which is created with the following command:
#!python
import pypsdier
pypsdier.create_handler()
Once the seed_handler.py file is available, you can use it to generate spreadsheets with the concentration values, to plot the files or simply to see the original simulation file, as explained in the next sections.
Reobtain the original simulation file
Run the seed_handler.py file with the flag --file on the seed, as indicated below
#!bash

python seed_handler.py --file example_1_mm.rde
This will print on the terminal the original file that was executed to generated the seed.
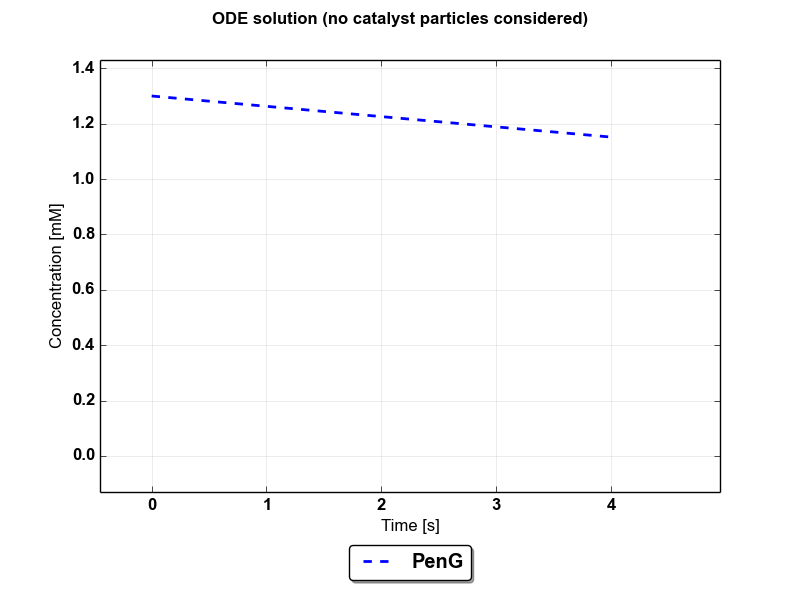
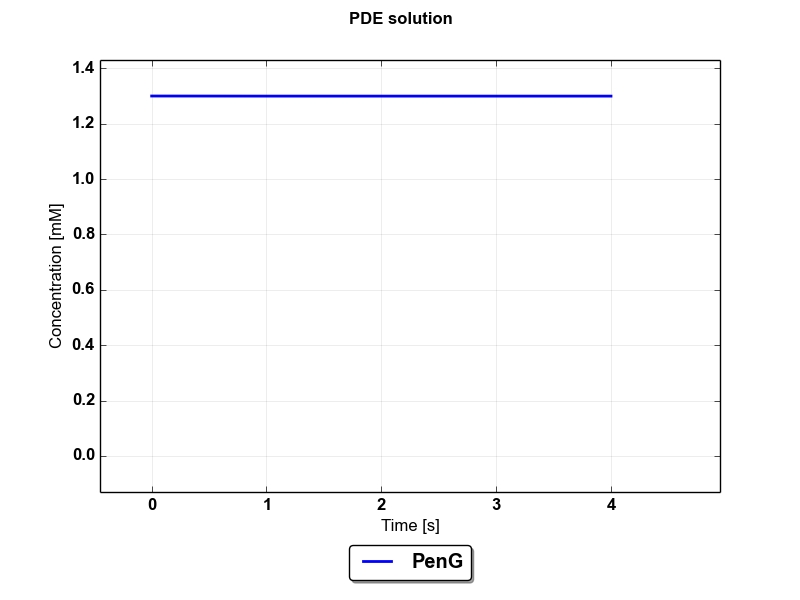
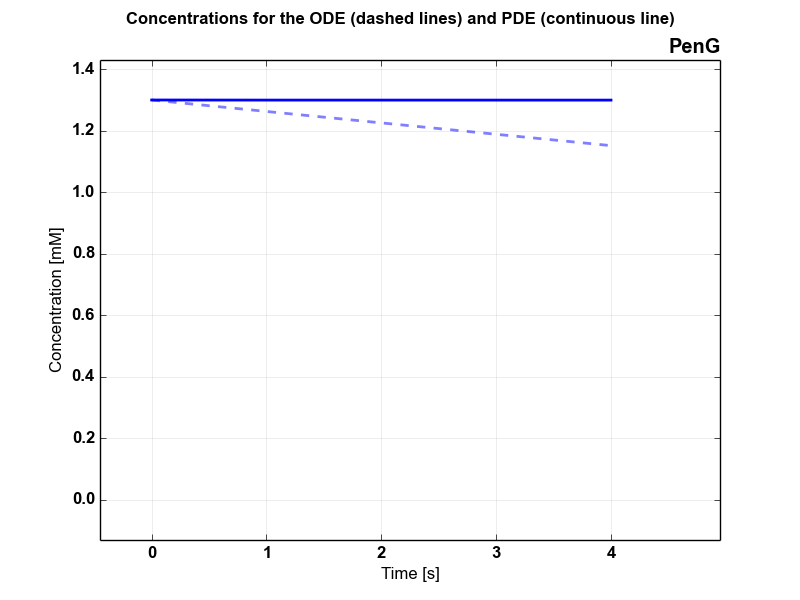
Generate sets of images
Run the seed_handler.py file with the flag --png on the seed, as indicated below
#!bash

python seed_handler.py --png example_1_mm.rde
This will generate the following images 1, 2, and 3.
Generating a spreadsheet
Run the seed_handler.py file with the flag --xls on the seed, as indicated below
#!bash

python seed_handler.py --xls example_1_mm.rde
This will generate a spreadsheet with the same name as the seed and the extension xls, in our case, example_1_mm.xls.
Inside the seed
If you want to generate your own images or further explore the data, you can open the seed using the pypsdier library, as shown below:
#!python

import pypsdier
seedfile = "example_1_mm.py"
params = pypsdier.grow(seedfile)

# Now params has the same parameters defined in the file, and some new additions.
# params["ODE"] is a dict with information on the ODE solution
# params["PDE"] is a dict with information on the PDE solution
Updated